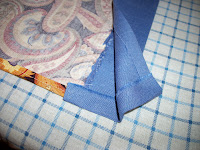
She has no idea that I made it for her. I'm hoping she uses it for craft projects, but at the very least I hope she likes it! I made it from scrap fabrics that I had here at the house.
I didn't buy any patterns, but I did have instructions. They were from this book:
 |
| |
I'm not going to detail the steps too much, just a little. This is a great book. I can follow a pattern (if its easy) but I love to just stick things together and make it happen. This book allowed me to feel I was doing that, while at the same time giving me a detailed resource.
My husband is so funny. I showed him the fabrics and asked him how he liked the colors, and, diplomat that he is, he said he was not able to envision things from scraps of fabric. He wouldn't have an opinion until it was complete. Cute.
Oh well, I said I made it from scraps.
I think its a fun combination. Plus I love paisley!
After cutting out the squares of fabric I needed for the apron and the pocket, I zig zag stitched around both. Then I folded about a 1/2 inch on both sides and the bottom of the apron piece and hemmed them. For the pocket I also used the zig zag stitch all around - but didn't hem it. I folded the piece into thirds, then folded it one inch off the sides of each fold, in order to ultimately end up with pockets that open wide. Ironed all the folds, and at this point I folded down the top of my pocket and hemmed only that side.
With my use of lovely WHITE thread you can see exactly what I've done... After hemming, I ironed and pinned the folds in place and pinned the pocket to the apron and sewed it on. I used a cool stitch on my machine called a satin stitch. Anyone who sews might know it but not only does it look interesting, it is extra strong. I used this stitch for in between each pocket as well.
I had to use a different footer for my machine to do that stitch. Wow I may end up being a sewer, yet! (...Why doesn't that word LOOK right??? :-)
I think this little detail is very cool. Between the folds and the stitching, I'm feeling pretty good. Just don't look at some of my wavy stitch lines!! Viewing them is an example of why you should use thread that matches and doesn't contrast!
This picture below shows how I interpreted the instructions for creating a nice tight stitch line for when you are putting on the apron and pulling the sashes. They may not be straight but I believe I did it right!
Finished!
Love it!


That is darling! Great job. I could use one for my hot glue gun, extra glue sticks, scissors, etc. A perfect crafting apron!
ReplyDeleteThank you, I'm so glad you like it! That is just what I thought it would be perfect for. ~Lori
ReplyDeleteI think you did a fantastic job and you made it for someone you love so that makes it even nicer!
ReplyDeleteThank you, Nancy! My mom has been very sick and my sister is working herself to death taking care of everything, and today I was able to fly to visit them and lend a hand for just a few days - and I gave her the apron. She loves it, mostly because I made it, lol. Great sister! ~Lori
ReplyDelete